

One of the most useful hacking tools is an OS called Kali Linux. It’s very popular since it comes with a bunch of commonly used hacking tools, labeled by category. This guide will teach you how to set up Kali Linux on Windows in a seamless virtual machine called WSL 2 (Windows Subsystem for Linux).
Sections of this guide were taken from kali.org/docs/wsl/wsl-preparationsIf you’re on an M1 Mac the guide at mac.itunderground.dk should work for you.
1: Setting up WSL 2
We want to start by installing WSL 2:
- Open a terminal with administrator permissions and run:
dism.exe /online /enable-feature /featurename:VirtualMachinePlatform /all /norestart
dism.exe /online /enable-feature /featurename:Microsoft-Windows-Subsystem-Linux /all- Restart your computer if prompted.
- Download and install the WSL 2 Linux Kernel from here: aka.ms/wsl2kernel
Only follow “Step 4” on that link. - Restart
- Open a terminal and run
wsl --set-default-version 2You now have WSL 2 installed on your computer and can start installing Kali!
2: Installing Kali Linux
This is where the fun begins.
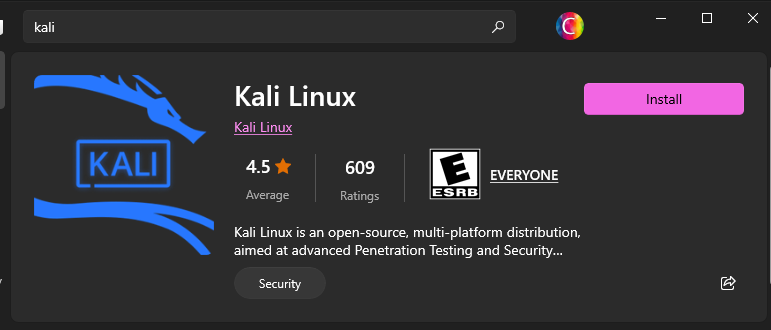
- Start by installing Kali Linux from the Microsoft Store
- Once it’s done installing, click “open” to finish the user creation.
- It will prompt you for a username and password. Note that while typing the password, you won’t be able to see the characters. This is a normal Linux privacy feature.
Make sure to remember your password!

After you’ve created your user, you will continue into the Kali terminal. Normally, there are 2 ways of entering Kali Linux. You can use whichever you prefer:
- Searching for “Kali Linux” in the Windows Search bar
- Opening a terminal and typing
kali
3: Installing common Kali tools
The Windows version of Kali Linux is a light version of Kali without a lot of the useful tools. Here we’ll finish installing the useful tools.
- Start by entering Kali Linux using one of the two methods outlined above. Then type the following command:
source <(curl -L setup.itunderground.dk)This command will download the script located at setup.itunderground.dk using a program called curl.
It will then run the script by “pushing” it (<) into source.
You will probably be prompted for the password you made in step 2. The installation will take a while and takes up around 15 GB of storage. If you feel like it has gotten stuck at any point in time for a while, press CTRL+C to stop it and rerun the command. It will continue where you stopped it.
During the installation, you will see a few blue configuration screens.
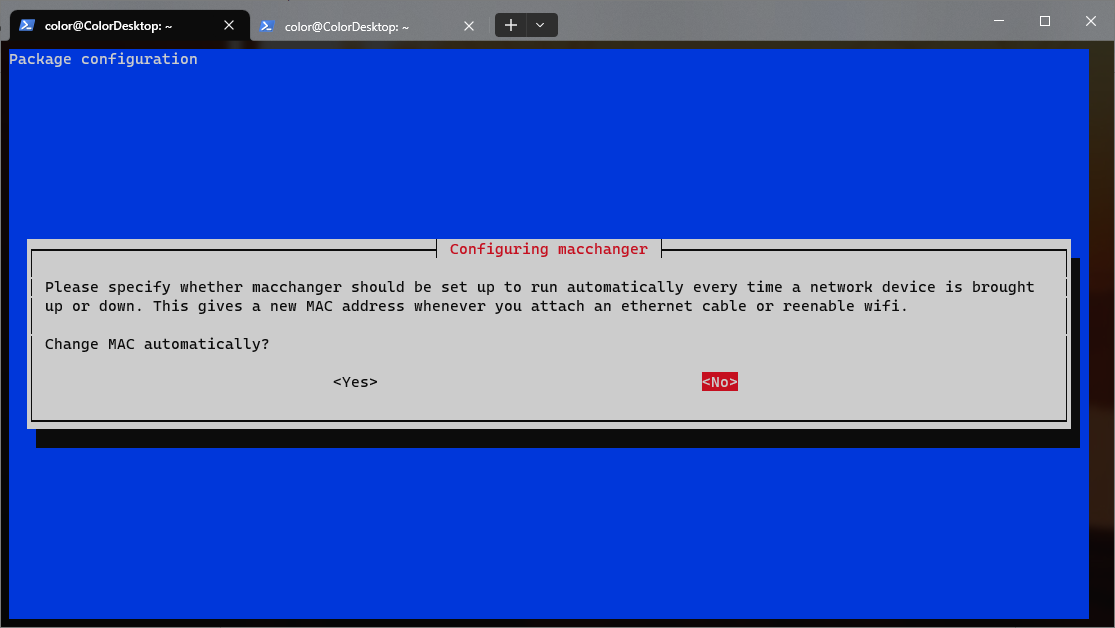
These are the options you want to select, in order:- Yes
- Yes (write your username, make sure to get it right!)
- No
- from inetd
Congratulations! You now have all the necessary Kali Linux tools installed!
Some quick pro tips about working in a Kali WSL environment:Use the command
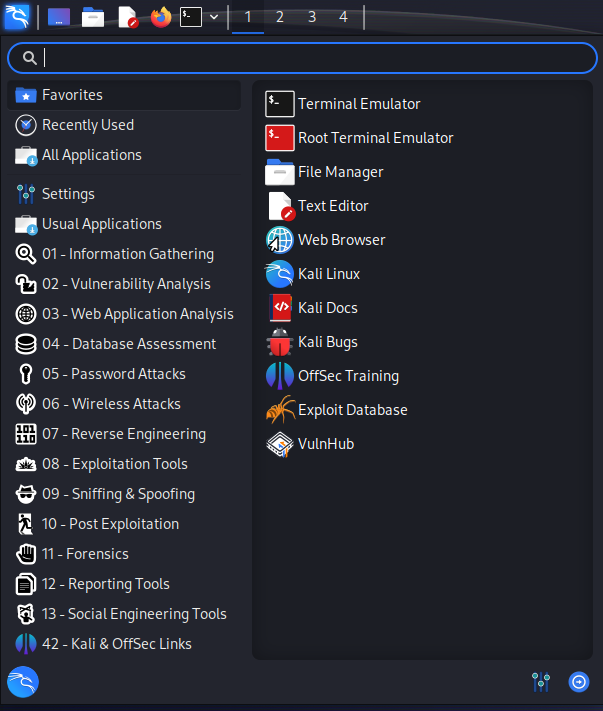
desktopto open up a Kali Linux desktop environment.- This is super useful if you’re still not entirely used to the CLI (there are also some tools that are GUI only!)
- You can find a list of common tools in the top left
You can find you Kali files in File Explorer by going to the very bottom in the left pane.
If you want to access your drives from within Kali, you can find them in the
/mnt/path. The C: drive is/mnt/c/for example.You can open an Explorer window in your current working directory with the
explorer.exe .command.If you have VSCode installed, get the WSL plugin. It allows you to open folders and files in WSL with better compatability. After you’ve installed it you can open a file or directory in VSCode with
code /path/to/fileorcode /path/to/directory, or use theWSL: Open Folder in WSL...VSCode command.
4: Now what?
The only way to get better at hacking is by doing. We recommend checking out PicoCTF for introductory hacking challenges, or HackTheBox for what’s closer to a real life “hacking simulation”.
Also stay tuned for an ITUnderground “getting started with hacking” guide. Coming soon!
A super helpful way to learn if you get stuck on a PicoCTF or HTB challenge is to look for what’s called a writup. This is basically a blog post detailing a step-by-step guide for how to complete the challenge. This is an amazing way to learn about new tools or approaches that you might be unfamiliar with. As long as you learn something, it will have been worth your time!